Online Inference#
This tutorial shows how to use trained PyTorch, TensorFlow, and ONNX (format) models, written in Python, directly in HPC workloads written in Fortran, C, C++ and Python.
The example simulation here is written in Python for brevity, however, the inference API in SmartRedis is the same (besides extra parameters for compiled langauges) across all clients.
Installing the ML backends#
In order to use the Orchestrator database as an inference engine, the Machine Learning (ML) backends need to be built and supplied to the database at runtime.
To check which backends are built, a simple helper function is available in SmartSim as shown below.
[1]:
## Installing the ML backends
from smartsim._core.utils.helpers import installed_redisai_backends
print(installed_redisai_backends())
{'tensorflow', 'torch'}
As you can see, only the Torch backend is built. In order to use the TensorFlow and ONNX backends as well, they need to be built.
The smart command line interface can be used to build the backends using the smart build command. The output of smart build --help is shown below.
[2]:
!smart build --help
usage: smart build [-h] [-v] [--device {cpu,gpu}] [--dragon]
                   [--only_python_packages] [--no_pt] [--no_tf] [--onnx]
                   [--torch_dir TORCH_DIR]
                   [--libtensorflow_dir LIBTENSORFLOW_DIR] [--keydb]
                   [--no_torch_with_mkl]

Build SmartSim dependencies (Redis, RedisAI, Dragon, ML runtimes)

options:
  -h, --help            show this help message and exit
  -v                    Enable verbose build process
  --device {cpu,gpu}    Device to build ML runtimes for
  --dragon              Install the dragon runtime
  --only_python_packages
                        Only evaluate the python packages (i.e. skip building
                        backends)
  --no_pt               Do not build PyTorch backend
  --no_tf               Do not build TensorFlow backend
  --onnx                Build ONNX backend (off by default)
  --torch_dir TORCH_DIR
                        Path to custom <path>/torch/share/cmake/Torch/
                        directory (ONLY USE IF NEEDED)
  --libtensorflow_dir LIBTENSORFLOW_DIR
                        Path to custom libtensorflow directory (ONLY USE IF
                        NEEDED)
  --keydb               Build KeyDB instead of Redis
  --no_torch_with_mkl   Do not build Torch with Intel MKL
We use smart clean first to remove the previous build, and then call smart build to build the new backend set. For larger teams, CrayLabs will help setup your system so that the backends do not have to be built by each user.
By default, the PyTorch and TensorFlow backends are built. To build all three backends for use on CPU, we issue the following command.
[3]:
!smart clean && smart build --device cpu --onnx
[SmartSim] INFO Successfully removed existing RedisAI installation
[SmartSim] INFO Successfully removed ML runtimes
[SmartSim] INFO Running SmartSim build process...
[SmartSim] INFO Checking requested versions...
[SmartSim] INFO Redis build complete!

ML Backends Requested
╒════════════╤════════╤══════╕
│ PyTorch    │ 2.1.0  │ True │
│ TensorFlow │ 2.13.1 │ True │
│ ONNX       │ 1.14.1 │ True │
╘════════════╧════════╧══════╛

Building for GPU support: False

[SmartSim] INFO Building RedisAI version 1.2.7 from https://github.com/RedisAI/RedisAI.git/
[SmartSim] INFO ML Backends and RedisAI build complete!
[SmartSim] INFO Tensorflow, Onnxruntime, Torch backend(s) built
[SmartSim] INFO SmartSim build complete!
Starting the Database for Inference#
SmartSim performs online inference by using the SmartRedis clients to call into the Machine Learning (ML) runtimes linked into the Orchestrator database. The Orchestrator is the name in SmartSim for a Redis or KeyDB database with a RedisAI module built into it with the ML runtimes.
Therefore, to perform inference, you must first create an Orchestrator database and launch it. There are two methods to couple the database to your application in order to add inference capability to your application. - standard (not colocated) - colocated
standard mode launches an optionally clustered (across many compute hosts) database instance that can be treated as a single storage device for many clients (possibly the many ranks of an MPI program) where there is a single address space for keys across all hosts.
colocated mode launches a orchestrator instance on each compute host used by a, possibly distributed, application. each instance contains their own address space for keys. In SmartSim, Model instances can be launched with a colocated orchetrator through Model.colocate_db_tcp or Model.colocate_db_udp. Colocated Models are used for highly scalable inference where global aggregations aren’t necessary for inference.
The code below launches the Orchestrator database using the standard deployment method.
[4]:
# some helper libraries for the tutorial
import io
import os
os.environ['TF_CPP_MIN_LOG_LEVEL'] = '3'
import logging
import numpy as np

# import smartsim and smartredis
from smartredis import Client
from smartsim import Experiment
[5]:
exp = Experiment("Inference-Tutorial", launcher="local")
[6]:
db = exp.create_database(port=6780, interface="lo")
exp.start(db)
Using PyTorch#
The Orchestrator supports both PyTorch models and TorchScript functions and scripts in PyTorch.
Below, the code is shown to create, jit-trace (prepare for inference), set, and call a PyTorch Convolutional Neural Network (CNN) with SmartSim and SmartRedis
[7]:
import torch
import torch.nn as nn
import torch.nn.functional as F


class Net(nn.Module):
    def __init__(self):
        super(Net, self).__init__()
        self.conv1 = nn.Conv2d(1, 32, 3, 1)
        self.conv2 = nn.Conv2d(32, 64, 3, 1)
        self.dropout1 = nn.Dropout(0.25)
        self.dropout2 = nn.Dropout(0.5)
        self.fc1 = nn.Linear(9216, 128)
        self.fc2 = nn.Linear(128, 10)

    def forward(self, x):
        x = self.conv1(x)
        x = F.relu(x)
        x = self.conv2(x)
        x = F.relu(x)
        x = F.max_pool2d(x, 2)
        x = self.dropout1(x)
        x = torch.flatten(x, 1)
        x = self.fc1(x)
        x = F.relu(x)
        x = self.dropout2(x)
        x = self.fc2(x)
        output = F.log_softmax(x, dim=1)
        return output
To set a PyTorch model, we create a function to “jit-trace” the model and save it to a buffer in memory.
If you aren’t familiar with the concept of tracing, take a look at the Torch documentation for trace
[8]:
# Initialize an instance of our CNN model
n = Net()
n.eval()

# prepare a sample input to trace on (random noise is fine)
example_forward_input = torch.rand(1, 1, 28, 28)

def create_torch_model(torch_module, example_forward_input):

    # perform the trace of the nn.Module.forward() method
    module = torch.jit.trace(torch_module, example_forward_input)

    # save the traced module to a buffer
    model_buffer = io.BytesIO()
    torch.jit.save(module, model_buffer)
    return model_buffer.getvalue()

traced_cnn = create_torch_model(n, example_forward_input)
Lastly, we use the SmartRedis Python client to
Connect to the database
Put a batch of 20 tensors into the database (
put_tensor)Set the Torch model in the database (
set_model)Run the model on the batch of tensors (
run_model)Retrieve the result (
get_tensor)
[9]:
client = Client(address=db.get_address()[0], cluster=False)

client.put_tensor("input", torch.rand(20, 1, 28, 28).numpy())

# put the PyTorch CNN in the database in GPU memory
client.set_model("cnn", traced_cnn, "TORCH", device="CPU")

# execute the model, supports a variable number of inputs and outputs
client.run_model("cnn", inputs=["input"], outputs=["output"])

# get the output
output = client.get_tensor("output")
print(f"Prediction: {output}")
Prediction: [[-2.2239347 -2.256488  -2.3910825 -2.2572591 -2.2663934 -2.3775585
  -2.257742  -2.3160243 -2.391289  -2.3055189]
 [-2.2149696 -2.2576108 -2.3899908 -2.2715292 -2.2628417 -2.3693023
  -2.260772  -2.3166935 -2.3967428 -2.3028378]
 [-2.2214003 -2.2581112 -2.3854284 -2.2616909 -2.2745335 -2.3779867
  -2.2570336 -2.3125517 -2.391247  -2.302534 ]
 [-2.214657  -2.2598932 -2.3800194 -2.2612374 -2.2718334 -2.3784144
  -2.2596886 -2.318937  -2.3904119 -2.3075597]
 [-2.2034936 -2.2570574 -2.4026587 -2.2698882 -2.2597382 -2.3796346
  -2.2662714 -2.3141642 -2.3986044 -2.2949069]
 [-2.2162325 -2.2635622 -2.3800213 -2.2569213 -2.264393  -2.3763664
  -2.2658355 -2.3211577 -2.3904028 -2.307555 ]
 [-2.2084794 -2.258525  -2.393487  -2.26341   -2.2674217 -2.3792422
  -2.264515  -2.3262923 -2.3823283 -2.300095 ]
 [-2.2175536 -2.2577217 -2.3975415 -2.2582505 -2.269493  -2.365971
  -2.2619228 -2.3258338 -2.3984828 -2.291332 ]
 [-2.2151139 -2.2522063 -2.3931108 -2.2577128 -2.270789  -2.371976
  -2.2567465 -2.32229   -2.395818  -2.308673 ]
 [-2.2141316 -2.2494154 -2.3948152 -2.2606037 -2.2732735 -2.3758345
  -2.2620056 -2.3184063 -2.385798  -2.3094575]
 [-2.221041  -2.2519057 -2.398841  -2.259931  -2.2686832 -2.3660865
  -2.2632158 -2.322879  -2.3970191 -2.2942836]
 [-2.2142313 -2.2578502 -2.393603  -2.2673647 -2.2553272 -2.37376
  -2.2617526 -2.3199627 -2.399065  -2.301728 ]
 [-2.2082942 -2.2571995 -2.3889875 -2.266007  -2.257706  -2.37675
  -2.266374  -2.3223817 -2.3961644 -2.304737 ]
 [-2.2229445 -2.2658186 -2.399095  -2.2566628 -2.266294  -2.3742397
  -2.2578638 -2.3047974 -2.3973055 -2.2988966]
 [-2.215887  -2.2676513 -2.3889093 -2.246127  -2.266115  -2.3842902
  -2.2586591 -2.3106883 -2.396018  -2.3104343]
 [-2.2099977 -2.2719226 -2.391469  -2.255561  -2.266949  -2.371345
  -2.2596216 -2.324484  -2.3890057 -2.3031068]
 [-2.214121  -2.2561312 -2.391877  -2.261881  -2.2639613 -2.3679278
  -2.269122  -2.3139405 -2.4036062 -2.3015296]
 [-2.22871   -2.256755  -2.3881361 -2.2651346 -2.2651856 -2.3733103
  -2.2641761 -2.3182902 -2.3855858 -2.2960906]
 [-2.2103846 -2.2450664 -2.3848588 -2.2795632 -2.2658024 -2.3679922
  -2.2666745 -2.3190453 -2.3987417 -2.3054008]
 [-2.2175698 -2.2573788 -2.391653  -2.2519581 -2.2637622 -2.3839104
  -2.265371  -2.3158426 -2.3929882 -2.3040662]]
As we gave the CNN random noise, the predictions reflect that.
If running on GPU, be sure to change the argument in the set_model call above to device="GPU".
Using TorchScript#
In addition to PyTorch models, TorchScript scripts and functions can be set in the Orchestrator database and called from any of the SmartRedis languages. Functions can be set in the database in Python prior to application launch and then used directly in Fortran, C, and C++ simulations.
The example below uses the TorchScript Singular Value Decomposition (SVD) function. The function set in side the database and then called with a random input tensor.
[10]:
def calc_svd(input_tensor):
    # svd function from TorchScript API
    return input_tensor.svd()
[11]:
# connect a client to the database
client = Client(address=db.get_address()[0], cluster=False)

# test the SVD function
tensor = np.random.randint(0, 100, size=(5, 3, 2)).astype(np.float32)
client.put_tensor("input", tensor)
client.set_function("svd", calc_svd)
client.run_script("svd", "calc_svd", ["input"], ["U", "S", "V"])
U = client.get_tensor("U")
S = client.get_tensor("S")
V = client.get_tensor("V")
print(f"U: {U}\n\n, S: {S}\n\n, V: {V}\n")
U: [[[-0.50057614  0.2622205 ]
  [-0.47629714 -0.8792326 ]
  [-0.7228863   0.39773142]]

 [[-0.45728168  0.88121146]
  [-0.37974676 -0.31532544]
  [-0.80416775 -0.35218775]]

 [[-0.4667158   0.8836199 ]
  [-0.47055572 -0.21237665]
  [-0.7488349  -0.4172673 ]]

 [[-0.32159734  0.92966324]
  [-0.6941528  -0.10238242]
  [-0.64399314 -0.35389856]]

 [[-0.6984835   0.4685579 ]
  [-0.55331963  0.12572214]
  [-0.45382637 -0.8744412 ]]]

, S: [[164.58028    49.682358 ]
 [120.11677    66.62553  ]
 [130.01929    17.520935 ]
 [198.615      22.047113 ]
 [154.67653     2.6773496]]

, V: [[[-0.7275351  -0.68607044]
  [-0.68607044  0.7275351 ]]

 [[-0.6071297   0.79460275]
  [-0.79460275 -0.6071297 ]]

 [[-0.604189    0.7968411 ]
  [-0.7968411  -0.604189  ]]

 [[-0.69911253 -0.7150117 ]
  [-0.7150117   0.69911253]]

 [[-0.8665945  -0.499013  ]
  [-0.499013    0.8665945 ]]]
[12]:
## TensorFlow and Keras
import tensorflow as tf
from tensorflow import keras
tf.get_logger().setLevel(logging.ERROR)

# create a simple Fully connected network in Keras
model = keras.Sequential(
    layers=[
        keras.layers.InputLayer(input_shape=(28, 28), name="input"),
        keras.layers.Flatten(input_shape=(28, 28), name="flatten"),
        keras.layers.Dense(128, activation="relu", name="dense"),
        keras.layers.Dense(10, activation="softmax", name="output"),
    ],
    name="FCN",
)

# Compile model with optimizer
model.compile(optimizer="adam",
              loss="sparse_categorical_crossentropy",
              metrics=["accuracy"])
Setting TensorFlow and Keras Models#
After a model is created (trained or not), the graph of the model is frozen and saved to file so the client method client.set_model_from_file can load it into the database.
SmartSim includes a utility to freeze the graph of a TensorFlow or Keras model in smartsim.ml.tf. To use TensorFlow or Keras in SmartSim, specify TF as the argument for backend in the call to client.set_model or client.set_model_from_file.
Note that TensorFlow and Keras, unlike the other ML libraries supported by SmartSim, requires an input and output argument in the call to set_model. These arguments correspond to the layer names of the created model. The smartsim.ml.tf.freeze_model utility returns these values for convenience as shown below.
[13]:
from smartsim.ml.tf import freeze_model

# SmartSim utility for Freezing the model and saving it to a file.
model_path, inputs, outputs = freeze_model(model, os.getcwd(), "fcn.pb")

# use the same client we used for PyTorch to set the TensorFlow model
# this time the method for setting a model from a saved file is shown.
# TensorFlow backed requires named inputs and outputs on graph
# this differs from PyTorch and ONNX.
client.set_model_from_file(
    "keras_fcn", model_path, "TF", device="CPU", inputs=inputs, outputs=outputs
)

# put random random input tensor into the database
input_data = np.random.rand(1, 28, 28).astype(np.float32)
client.put_tensor("input", input_data)

# run the Fully Connected Network model on the tensor we just put
# in and store the result of the inference at the "output" key
client.run_model("keras_fcn", "input", "output")

# get the result of the inference
pred = client.get_tensor("output")
print(pred)
[[0.06595241 0.11921222 0.02889561 0.20963618 0.08950416 0.11298887
  0.05179482 0.09778847 0.14826407 0.07596324]]
Using ONNX#
ONNX is a standard format for representing models. A number of different Machine Learning Libraries are supported by ONNX and can be readily used with SmartSim.
Some popular ones are:
As well as some that are not listed. There are also many tools to help convert models to ONNX.
And PyTorch has its own converter.
Below are some examples of a few models in Scikit-learn that are converted into ONNX format for use with SmartSim. To use ONNX in SmartSim, specify ONNX as the argument for backend in the call to client.set_model or client.set_model_from_file
Scikit-Learn K-means Cluster#
K-means clustering is an unsupervised ML algorithm. It is used to categorize data points into functional groups (“clusters”). Scikit Learn has a built in implementation of K-means clustering and it is easily converted to ONNX for use with SmartSim through skl2onnx.to_onnx
Since the KMeans model returns two outputs, we provide the client.run_model call with two output key names.
[14]:
from skl2onnx import to_onnx
from sklearn.cluster import KMeans
[15]:
X = np.arange(20, dtype=np.float32).reshape(10, 2)
tr = KMeans(n_clusters=2)
tr.fit(X)

# save the trained k-means model in memory with skl2onnx
kmeans = to_onnx(tr, X, target_opset=11)
model = kmeans.SerializeToString()

# random input data
sample = np.arange(20, dtype=np.float32).reshape(10, 2)

# use the same client from TensorFlow and Pytorch examples.
client.put_tensor("input", sample)
client.set_model("kmeans", model, "ONNX", device="CPU")
client.run_model("kmeans", inputs="input", outputs=["labels", "transform"])

print(client.get_tensor("labels"))
Default@[0 0 0 0 0 1 1 1 1 1]
Scikit-Learn Random Forest#
The Random Forest example uses the Iris dataset from Scikit Learn to train a RandomForestRegressor. As with the other examples, the skl2onnx function skl2onnx.to_onnx is used to convert the model to ONNX format.
[16]:
from sklearn.datasets import load_iris
from sklearn.ensemble import RandomForestRegressor
from sklearn.model_selection import train_test_split
[17]:
iris = load_iris()
X, y = iris.data, iris.target
X_train, X_test, y_train, _ = train_test_split(X, y, random_state=13)
clr = RandomForestRegressor(n_jobs=1, n_estimators=100)
clr.fit(X_train, y_train)

rf_model = to_onnx(clr, X_test.astype(np.float32), target_opset=11)

sample = np.array([[6.4, 2.8, 5.6, 2.2]]).astype(np.float32)
model = rf_model.SerializeToString()

client.put_tensor("input", sample)
client.set_model("rf_regressor", model, "ONNX", device="CPU")
client.run_model("rf_regressor", inputs="input", outputs="output")
print(client.get_tensor("output"))
[[1.9999987]]
[18]:
exp.stop(db)
[19]:
exp.summary(style="html")
[19]:
| Name | Entity-Type | JobID | RunID | Time | Status | Returncode | |
|---|---|---|---|---|---|---|---|
| 0 | orchestrator_0 | DBNode | 2809 | 0 | 70.9690 | SmartSimStatus.STATUS_CANCELLED | 0 |
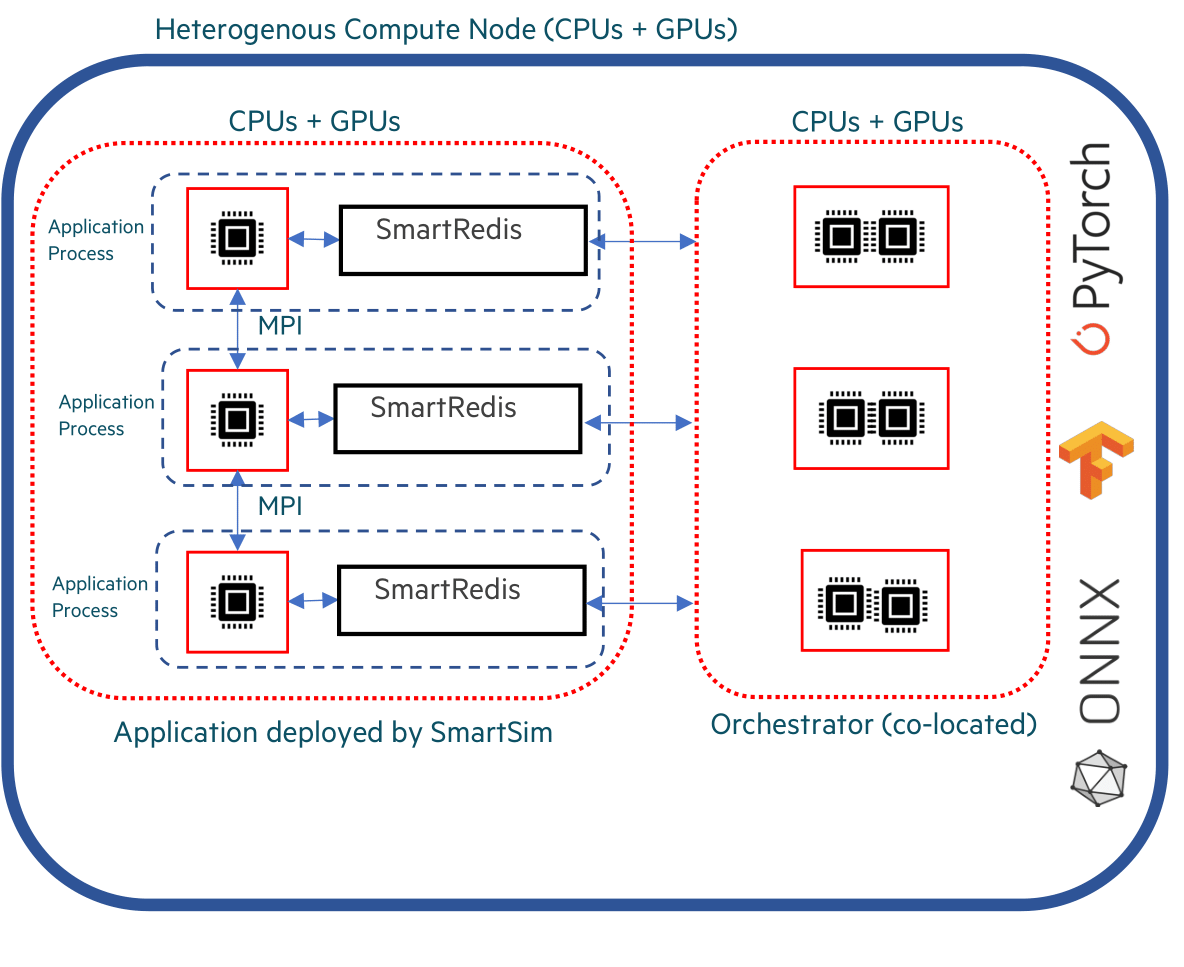
Colocated Deployment#
A colocated Orchestrator is a special type of Orchestrator that is deployed on the same compute hosts an a Model instance defined by the user. In this deployment, the database is not connected together in a cluster and each shard of the database is addressed individually by the processes running on that compute host. This is particularly important for GPU-intensive workloads which require frequent communication with the database.
[20]:
# create colocated model
colo_settings = exp.create_run_settings(
    exe="python",
    exe_args="./colo-db-torch-example.py"
)

colo_model = exp.create_model("colocated_model", colo_settings)
colo_model.colocate_db_tcp(
    port=6780,
    db_cpus=1,
    debug=False,
    ifname="lo"
)
[21]:
exp.start(colo_model, summary=True)
19:30:35 HPE-C02YR4ANLVCJ SmartSim[1187:MainThread] INFO

=== Launch Summary ===
Experiment: Inference-Tutorial
Experiment Path: /home/craylabs/tutorials/ml_inference/Inference-Tutorial
Launcher: local
Models: 1
Database Status: inactive

=== Models ===
colocated_model
Executable: /usr/local/anaconda3/envs/ss-py3.10/bin/python
Executable Arguments: ./colo-db-torch-example.py
Co-located Database: True


19:30:38 HPE-C02YR4ANLVCJ SmartSim[1187:JobManager] WARNING colocated_model(3199): SmartSimStatus.STATUS_FAILED
19:30:38 HPE-C02YR4ANLVCJ SmartSim[1187:JobManager] WARNING colocated_model failed. See below for details
Job status at failure: SmartSimStatus.STATUS_FAILED
Launcher status at failure: Failed
Job returncode: 2
Error and output file located at: /home/craylabs/tutorials/ml_inference/Inference-Tutorial/colocated_model
[22]:
exp.summary(style="html")
[22]:
| Name | Entity-Type | JobID | RunID | Time | Status | Returncode | |
|---|---|---|---|---|---|---|---|
| 0 | orchestrator_0 | DBNode | 2809 | 0 | 70.9690 | SmartSimStatus.STATUS_CANCELLED | 0 |
| 1 | colocated_model | Model | 3199 | 0 | 3.1599 | SmartSimStatus.STATUS_FAILED | 2 |