Orchestrator#
Overview#
The Orchestrator is an in-memory database with features built for
AI-enabled workflows including online training, low-latency inference, cross-application data
exchange, online interactive visualization, online data analysis, computational steering, and more.
An Orchestrator can be thought of as a general feature store
capable of storing numerical data (tensors and Datasets), AI models (TF, TF-lite, PyTorch, or ONNX),
and scripts (TorchScripts). In addition to storing data, the Orchestrator is capable of
executing AI models and TorchScripts on the stored data using CPUs or GPUs.
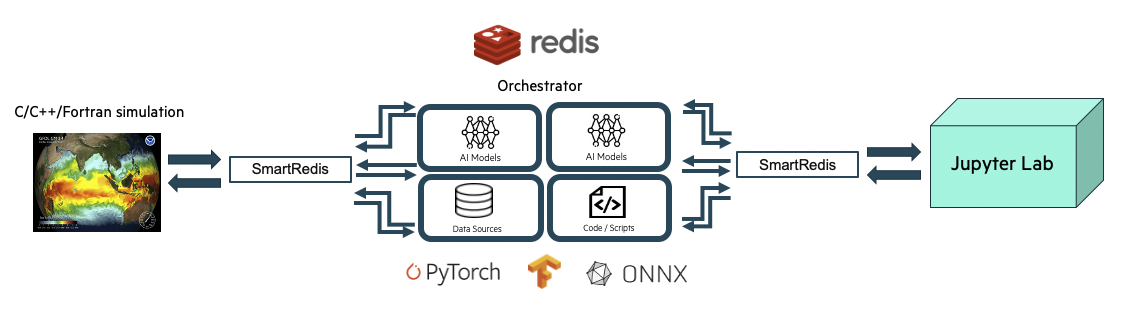
Sample Experiment showing a user application leveraging
machine learning infrastructure launched by SmartSim and connected
to an online analysis and visualization simulation via the Orchestrator.#
Users can establish a connection to the Orchestrator from within Model executable code, Ensemble
member executable code, or Experiment driver scripts by using the
SmartRedis Client library.
SmartSim offers two types of Orchestrator deployments:
- Standalone Deployment
A standalone
Orchestratoris ideal for systems that have heterogeneous node types (i.e. a mix of CPU-only and GPU-enabled compute nodes) where ML model and TorchScript evaluation is more efficiently performed off-node. This deployment is also ideal for workflows relying on data exchange between multiple applications (e.g. online analysis, visualization, computational steering, or producer/consumer application couplings). Standalone deployment is also optimal for high data throughput scenarios whereOrchestratorsrequire large amounts of compute resources.
- Colocated Deployment
A colocated
Orchestratoris ideal when the data and hardware accelerator are located on the same compute node. This setup helps reduce latency in ML inference and TorchScript evaluation by eliminating off-node communication.
Warning
Colocated Orchestrators cannot share data across compute nodes.
Communication is only supported between a Model and colocated Orchestrator pair.
SmartSim allows users to launch multiple Orchestrators of either type during
the course of an Experiment. If a workflow requires a multiple Orchestrator environment, a
db_identifier argument must be specified during Orchestrator initialization. Users can connect to
Orchestrators in a multiple Orchestrator workflow by specifying the respective db_identifier argument
within a ConfigOptions object that is passed into the SmartRedis Client constructor.
Standalone Deployment#
Overview#
During standalone Orchestrator deployment, a SmartSim Orchestrator (the database) runs on separate
compute node(s) from the SmartSim Model node(s). A standalone Orchestrator can be deployed on a single
node (single-sharded) or distributed (sharded) over multiple nodes. With a multi-node Orchestrator, users can
scale the number of database nodes for inference and script evaluation, enabling
increased in-memory capacity for data storage in large-scale workflows. Single-node
Orchestrators are effective for small-scale workflows and offer lower latency for Client API calls
that involve data appending or processing (e.g. Client.append_to_list, Client.run_model, etc).
When connecting to a standalone Orchestrator from within a Model application, the user has
several options to connect a SmartRedis Client:
In an
Experimentwith a single deployedOrchestrator, users can rely on SmartRedis to detect theOrchestratoraddress through runtime configuration of the SmartSimModelenvironment. A defaultClientconstructor, with no user-specified parameters, is sufficient to connect to theOrchestrator. The only exception is for the PythonClient, which requires the cluster constructor parameter to differentiate between standalone deployment and colocated deployment.In an
Experimentwith multipleOrchestrators, users can connect to a specificOrchestratorby first specifying the db_identifier in theConfigOptionsconstructor within the executable application. Subsequently, users should pass theConfigOptionsinstance to theClientconstructor.Users can specify or override automatically configured connection options by providing the
Orchestratoraddress in theConfigOptionsobject. Subsequently, users should pass theConfigOptionsinstance to theClientconstructor.
If connecting to a standalone Orchestrator from a Experiment driver script, the user must specify
the address of the Orchestrator to the Client constructor. SmartSim does not automatically
configure the environment of the Experiment driver script to connect to an Orchestrator. Users
can access an Orchestrators address through Orchestrator.get_address.
Note
In SmartSim Model applications, it is advisable to avoid specifying addresses directly to the Client constructor.
Utilizing the SmartSim environment configuration for SmartRedis Client connections
allows the SmartSim Model application code to remain unchanged even as Orchestrator deployment
options vary.
The following image illustrates
communication between a standalone Orchestrator and a
SmartSim Model. In the diagram, the application is running on multiple compute nodes,
separate from the Orchestrator compute nodes. Communication is established between the
Model application and the sharded Orchestrator using the SmartRedis client.

Sample Standalone Orchestrator Deployment#
Note
Users do not need to know how the data is stored in a standalone configuration and
can address the cluster with the SmartRedis Client like a single block of memory
using simple put/get semantics in SmartRedis.
In scenarios where data needs to be shared amongst Experiment entities,
such as online analysis, training, and processing, a standalone Orchestrator
is optimal. The data produced by multiple processes in a Model is stored in the standalone
Orchestrator and is available for consumption by other Model’s.
If a workflow requires an application to leverage multiple standalone deployments,
multiple Clients can be instantiated within an application,
with each Client connected to a unique Orchestrator. This is accomplished through the use of the
db-identifier and ConfigOptions object specified at Orchestrator initialization time.
For more information on a multiple database Experiment, visit the Multiple Orchestrators section on
this page.
Example#
In the following example, we demonstrate deploying a standalone Orchestrator on an HPC system.
Once the standalone Orchestrator is launched from the Experiment driver script, we walk through
connecting a SmartRedis Client to the Orchestrator from within the Model
application to transmit and poll for data.
The example is comprised of two script files:
- Application Script
The application script is a Python file that contains instructions to create a SmartRedis
Clientconnection to the standaloneOrchestrator. To demonstrate the ability of workflow components to access data from other entities, we retrieve the tensors set by the driver script using a SmartRedisClientin the application script. We then instruct theClientto send and retrieve data from within the application script. The example source code is available in the dropdown below for convenient execution and customization.Example Application Script source code
from smartredis import Client, LLInfo
import numpy as np

# Initialize a SmartRedis Client
application_client = Client(cluster=True)

# Retrieve the driver script tensor from Orchestrator
driver_script_tensor = application_client.get_tensor("tensor_1")
# Log the tensor
application_client.log_data(LLInfo, f"The multi-sharded db tensor is: {driver_script_tensor}")

# Create a NumPy array
local_array = np.array([5, 6, 7, 8])
# Use SmartRedis client to place tensor in multi-sharded db
application_client.put_tensor("tensor_2", local_array)
- Experiment Driver Script
The
Experimentdriver script is responsible for launching and managing SmartSim entities. Within this script, we use theExperimentAPI to create and launch a standaloneOrchestrator. To demonstrate the capability of aModelapplication to accessOrchestratordata sent from other sources, we employ the SmartRedisClientin the driver script to store a tensor in theOrchestrator, which is later retrieved by theModelapplication. To employ the application script, we initialize aModelobject with the application script as the executable, launch theOrchestrator, and then launch theModel.To further demonstrate the ability of workflow components to access data from other entities, we retrieve the tensors stored by the completed
Modelusing a SmartRedisClientin the driver script. Lastly, we tear down theOrchestrator. The example source code is available in the dropdown below for convenient execution and customization.Example Experiment Driver Script Source Code
import numpy as np
from smartredis import Client
from smartsim import Experiment
from smartsim.log import get_logger

# Initialize the logger
logger = get_logger("Example Experiment Log")
# Initialize the Experiment
exp = Experiment("getting-started", launcher="auto")

# Initialize a multi-sharded Orchestrator
standalone_orchestrator = exp.create_database(db_nodes=3)

# Initialize a SmartRedis client for multi-sharded Orchestrator
driver_client = Client(cluster=True, address=standalone_orchestrator.get_address()[0])

# Create NumPy array
local_array = np.array([1, 2, 3, 4])
# Use the SmartRedis client to place tensor in the standalone Orchestrator
driver_client.put_tensor("tensor_1", local_array)

# Initialize a RunSettings object
model_settings = exp.create_run_settings(exe="/path/to/executable_simulation")
model_settings.set_nodes(1)

# Initialize the Model
model = exp.create_model("model", model_settings)

# Create the output directory
exp.generate(standalone_orchestrator, model)

# Launch the multi-sharded Orchestrator
exp.start(standalone_orchestrator)

# Launch the Model
exp.start(model, block=True, summary=True)

# Poll the tensors placed by the Model
app_tensor = driver_client.poll_key("tensor_2", 100, 10)
# Validate that the tensor exists
logger.info(f"The tensor exists: {app_tensor}")

# Cleanup the Orchestrator
exp.stop(standalone_orchestrator)
# Print the Experiment summary
logger.info(exp.summary())
Application Script#
To begin writing the application script, import the necessary SmartRedis packages:
1from smartredis import Client, LLInfo
2import numpy as np
Client Initialization#
To establish a connection with the Orchestrator, we need to initialize a new SmartRedis Client.
Because the Orchestrator launched in the driver script is sharded, we specify the
constructor argument cluster as True.
1# Initialize a SmartRedis Client
2application_client = Client(cluster=True)
Note
Note that the C/C++/Fortran SmartRedis Clients are capable of reading cluster configurations
from the SmartSim Model environment and the cluster constructor argument does not need to be specified
in those Client languages.
Since there is only one Orchestrator launched in the Experiment
(the standalone Orchestrator), specifying an Orchestrator db_identifier
is not required when initializing the SmartRedis Client.
SmartRedis will handle the connection configuration.
Note
To create a SmartRedis Client connection to the standalone Orchestrator, the Orchestrator must be launched
from within the driver script prior to the start of the Model.
Data Retrieval#
To confirm a successful connection to the Orchestrator, we retrieve the tensor set from the Experiment script.
Use the Client.get_tensor method to retrieve the tensor named tensor_1 placed by the driver script:
1# Retrieve the driver script tensor from Orchestrator
2driver_script_tensor = application_client.get_tensor("tensor_1")
3# Log the tensor
4application_client.log_data(LLInfo, f"The multi-sharded db tensor is: {driver_script_tensor}")
After the Model is launched by the driver script, the following output will appear in
getting-started/model/model.out:
Default@17-11-48:The multi-sharded db tensor is: [1 2 3 4]
Data Storage#
Next, create a NumPy tensor to send to the standalone Orchestrator using
Client.put_tensor(name, data):
1# Create a NumPy array
2local_array = np.array([5, 6, 7, 8])
3# Use SmartRedis client to place tensor in multi-sharded db
4application_client.put_tensor("tensor_2", local_array)
We retrieve “tensor_2” in the Experiment driver script.
Experiment Driver Script#
To run the previous application script, we define a Model and Orchestrator within the
Experiment driver script. Configuring and launching workflow entities (Model and Orchestrator) requires the utilization of
Experiment class methods. The Experiment object is intended to be instantiated
once and utilized throughout the workflow runtime.
In this example, we instantiate an Experiment object with the name getting-started
and the launcher set to auto. When using launcher=auto, SmartSim attempts to find a launcher on the machine.
For example, if this script were run on a Slurm-based system, SmartSim will automatically set the launcher to slurm.
We also setup the SmartSim logger to output information from the Experiment at runtime:
1import numpy as np
2from smartredis import Client
3from smartsim import Experiment
4from smartsim.log import get_logger
5
6# Initialize the logger
7logger = get_logger("Example Experiment Log")
8# Initialize the Experiment
9exp = Experiment("getting-started", launcher="auto")
Orchestrator Initialization#
In the next stage of the Experiment, we create a standalone Orchestrator.
To create a standalone Orchestrator, utilize the Experiment.create_database function:
1# Initialize a multi-sharded Orchestrator
2standalone_orchestrator = exp.create_database(db_nodes=3)
Client Initialization#
The SmartRedis Client object contains functions that manipulate, send, and retrieve
data on the Orchestrator. Begin by initializing a SmartRedis Client object for the standalone Orchestrator.
SmartRedis Clients in driver scripts do not have the ability to use a db-identifier or
rely on automatic configurations to connect to Orchestrators. Therefore, when creating a SmartRedis Client
connection from within a driver script, specify the address of the Orchestrator you would like to connect to.
You can easily retrieve the Orchestrator address using the Orchestrator.get_address function:
1# Initialize a SmartRedis client for multi-sharded Orchestrator
2driver_client = Client(cluster=True, address=standalone_orchestrator.get_address()[0])
Data Storage#
In the application script, we retrieved a NumPy tensor stored from within the driver script.
To support the application functionality, we create a
NumPy array in the Experiment driver script to send to the Orchestrator. To
send a tensor to the Orchestrator, use the function Client.put_tensor(name, data):
1# Create NumPy array
2local_array = np.array([1, 2, 3, 4])
3# Use the SmartRedis client to place tensor in the standalone Orchestrator
4driver_client.put_tensor("tensor_1", local_array)
Model Initialization#
In the next stage of the Experiment, we configure and create
a SmartSim Model and specify the executable path during Model creation:
1# Initialize a RunSettings object
2model_settings = exp.create_run_settings(exe="/path/to/executable_simulation")
3model_settings.set_nodes(1)
4
5# Initialize the Model
6model = exp.create_model("model", model_settings)
File Generation#
To create an isolated output directory for the Orchestrator and Model, invoke Experiment.generate on the
Experiment instance exp with standalone_orchestrator and model as input parameters:
1# Create the output directory
2exp.generate(standalone_orchestrator, model)
Invoking Experiment.generate(standalone_orchestrator, model) will create two directories:
standalone_orchestrator/ and model/. Each of these directories will store
two output files: a .out file and a .err file.
Note
It is important to invoke Experiment.generate with all Experiment entity instances
before launching. This will ensure that the output files are organized in the main experiment-name/
folder. In this example, the Experiment folder is named getting-started/.
Entity Deployment#
In the next stage of the Experiment, we launch the Orchestrator, then launch the Model.
Step 1: Start Orchestrator#
In the context of this Experiment, it’s essential to create and launch
the Orchestrator as a preliminary step before any other workflow entities. This is important
because the application requests and sends tensors to a launched Orchestrator.
To launch the Orchestrator, pass the Orchestrator instance to Experiment.start.
1# Launch the multi-sharded Orchestrator
2exp.start(standalone_orchestrator)
The Experiment.start function launches the Orchestrator for use within the workflow.
In other words, the function deploys the Orchestrator on the allocated compute resources.
Step 2: Start Model#
Next, launch the model instance using the Experiment.start function:
1# Launch the Model
2exp.start(model, block=True, summary=True)
In the next subsection, we request tensors placed by the Model application.
We specify block=True to exp.start to require the Model to finish before
the Experiment continues.
Data Polling#
Next, check if the tensor exists in the standalone Orchestrator using Client.poll_tensor.
This function queries for data in the Orchestrator. The function requires the tensor name (name),
how many milliseconds to wait in between queries (poll_frequency_ms),
and the total number of times to query (num_tries). Check if the data exists in the Orchestrator by
polling every 100 milliseconds until 10 attempts have completed:
1# Poll the tensors placed by the Model
2app_tensor = driver_client.poll_key("tensor_2", 100, 10)
3# Validate that the tensor exists
4logger.info(f"The tensor exists: {app_tensor}")
When you execute the driver script, the output will be as follows:
23:45:46 system.host.com SmartSim[87400] INFO The tensor exists: True
Cleanup#
Finally, use the Experiment.stop function to stop the Orchestrator instance. Print the
workflow summary with Experiment.summary:
1# Cleanup the Orchestrator
2exp.stop(standalone_orchestrator)
3# Print the Experiment summary
4logger.info(exp.summary())
When you run the Experiment, the following output will appear:
|    | Name           | Entity-Type   | JobID       | RunID   | Time    | Status    | Returncode   |
|----|----------------|---------------|-------------|---------|---------|-----------|--------------|
| 0  | model          | Model         | 1658679.3   | 0       | 1.3342  | Completed | 0            |
| 1  | orchestrator_0 | DBNode        | 1658679.2+2 | 0       | 42.8742 | Cancelled | 0            |
Colocated Deployment#
Overview#
During colocated Orchestrator deployment, a SmartSim Orchestrator (the database) runs on
the Model’s compute node(s). Colocated Orchestrators can only be deployed as isolated instances
on each compute node and cannot be clustered over multiple nodes. The Orchestrator on each application node is
utilized by SmartRedis Clients on the same node. With a colocated Orchestrator, all interactions
with the database occur on the same node, thus resulting in lower latency compared to the standard Orchestrator.
A colocated Orchestrator is ideal when the data and hardware accelerator are located on the
same compute node.
Communication between a colocated Orchestrator and Model is initiated in the application through a
SmartRedis Client. Since a colocated Orchestrator is launched when the Model
is started by the Experiment, connecting a SmartRedis Client to a colocated Orchestrator is only possible from within
the associated Model application.
There are three methods for connecting the SmartRedis Client to the colocated Orchestrator:
In an
Experimentwith a single deployedOrchestrator, users can rely on SmartRedis to detect theOrchestratoraddress through runtime configuration of the SmartSimModelenvironment. A defaultClientconstructor, with no user-specified parameters, is sufficient to connect to theOrchestrator. The only exception is for the PythonClient, which requires the cluster=False constructor parameter for the colocatedOrchestrator.In an
Experimentwith multipleOrchestrators, users can connect to a specificOrchestratorby first specifying the db_identifier in theConfigOptionsconstructor. Subsequently, users should pass theConfigOptionsinstance to theClientconstructor.Users can specify or override automatically configured connection options by providing the
Orchestratoraddress in theConfigOptionsobject. Subsequently, users should pass theConfigOptionsinstance to theClientconstructor.
Below is an image illustrating communication within a colocated Model spanning multiple compute nodes.
As demonstrated in the diagram, each process of the application creates its own SmartRedis Client
connection to the Orchestrator running on the same host.
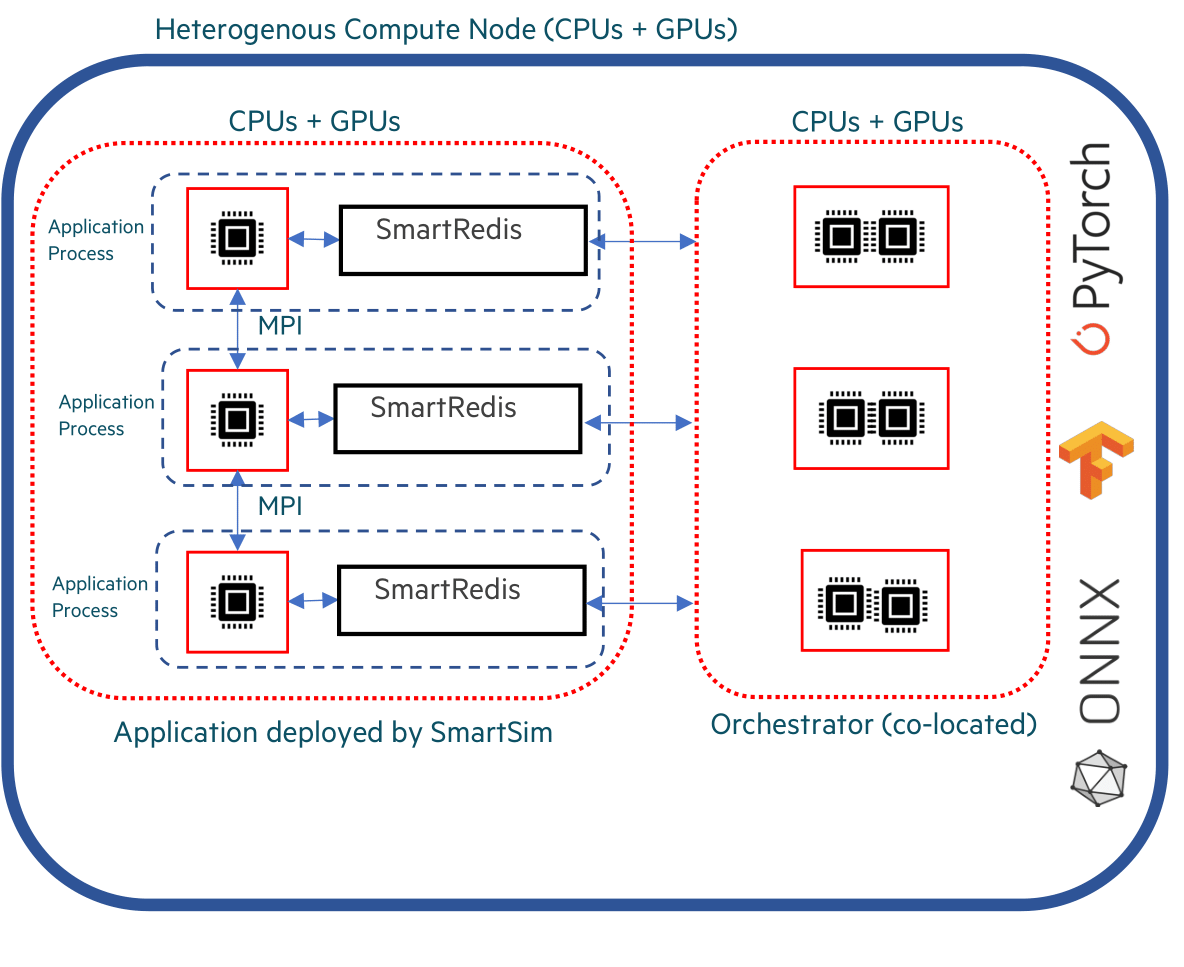
Sample Colocated Orchestrator Deployment#
Colocated deployment is ideal for highly performant online inference scenarios where a distributed application (likely an MPI application) is performing inference with data local to each process. With colocated deployment, data does not need to travel off-node to be used to evaluate a ML model, and the results of the ML model evaluation are stored on-node.
If a workflow requires an application to both leverage colocated
deployment and standalone deployment, multiple Clients can be instantiated within an application,
with each Client connected to a unique deployment. This is accomplished through the use of the
db-identifier specified at Orchestrator initialization time.
Example#
In the following example, we demonstrate deploying a colocated Orchestrator on an HPC system.
Once the Orchestrator is launched, we walk through connecting a SmartRedis Client
from within the application script to transmit and poll for data on the Orchestrator.
The example is comprised of two script files:
- Application Script
The application script is a Python script that connects a SmartRedis
Clientto the colocatedOrchestrator. From within the application script, theClientis utilized to both send and retrieve data. The source code example is available in the dropdown below for convenient execution and customization.Example Application Script Source Code
from smartredis import Client, LLInfo
import numpy as np

# Initialize a Client
colo_client = Client(cluster=False)

# Create NumPy array
local_array = np.array([1, 2, 3, 4])
# Store the NumPy tensor
colo_client.put_tensor("tensor_1", local_array)

# Retrieve tensor from driver script
local_tensor = colo_client.get_tensor("tensor_1")
# Log tensor
colo_client.log_data(LLInfo, f"The colocated db tensor is: {local_tensor}")
- Experiment Driver Script
The
Experimentdriver script launches and manages the example entities through theExperimentAPI. In the driver script, we use theExperimentAPI to create and launch a colocatedModel. The source code example is available in the dropdown below for convenient execution and customization.Example Experiment Driver source code
import numpy as np
from smartredis import Client
from smartsim import Experiment
from smartsim.log import get_logger

# Initialize a logger object
logger = get_logger("Example Experiment Log")
# Initialize the Experiment
exp = Experiment("getting-started", launcher="auto")

# Initialize a RunSettings object
model_settings = exp.create_run_settings(exe="path/to/executable_simulation")
# Configure RunSettings object
model_settings.set_nodes(1)

# Initialize a SmartSim Model
model = exp.create_model("colo_model", model_settings)

# Colocate the Model
model.colocate_db_uds()

# Generate output files
exp.generate(model)

# Launch the colocated Model
exp.start(model, block=True, summary=True)

# Log the Experiment summary
logger.info(exp.summary())
Application Script#
To begin writing the application script, import the necessary SmartRedis packages:
1from smartredis import Client, LLInfo
2import numpy as np
Client Initialization#
To establish a connection with the colocated Orchestrator, we need to initialize a
new SmartRedis Client and specify cluster=False since colocated deployments are never
clustered but only single-sharded.
1# Initialize a Client
2colo_client = Client(cluster=False)
Note
Note that the C/C++/Fortran SmartRedis Clients are capable of reading cluster configurations
from the Model environment and the cluster constructor argument does not need to be specified
in those Client languages.
Note
Since there is only one Orchestrator launched in the Experiment
(the colocated Orchestrator), specifying a Orchestrator db_identifier
is not required when initializing the Client. SmartRedis will handle the
connection configuration.
Note
To create a Client connection to the colocated Orchestrator, the colocated Model must be launched
from within the driver script. You must execute the Python driver script, otherwise, there will
be no Orchestrator to connect the Client to.
Data Storage#
Next, using the SmartRedis Client instance, we create and store a NumPy tensor through
Client.put_tensor(name, data):
1# Create NumPy array
2local_array = np.array([1, 2, 3, 4])
3# Store the NumPy tensor
4colo_client.put_tensor("tensor_1", local_array)
We will retrieve “tensor_1” in the following section.
Data Retrieval#
To confirm a successful connection to the Orchestrator, we retrieve the tensor we stored.
Use the Client.get_tensor method to retrieve the tensor by specifying the name
“tensor_1”:
1# Retrieve tensor from driver script
2local_tensor = colo_client.get_tensor("tensor_1")
3# Log tensor
4colo_client.log_data(LLInfo, f"The colocated db tensor is: {local_tensor}")
When the Experiment completes, you can find the following log message in colo_model.out:
Default@21-48-01:The colocated db tensor is: [1 2 3 4]
Experiment Driver Script#
To run the previous application script, a Model object must be configured and launched within the
Experiment driver script. Configuring and launching workflow entities (Model)
requires the utilization of Experiment class methods. The Experiment object is intended to
be instantiated once and utilized throughout the workflow runtime.
In this example, we instantiate an Experiment object with the name getting-started
and the launcher set to auto. When using launcher=auto, SmartSim attempts to find a launcher on the machine.
In this case, since we are running the example on a Slurm-based machine,
SmartSim will automatically set the launcher to slurm. We set up the SmartSim logger
to output information from the Experiment at runtime:
1import numpy as np
2from smartredis import Client
3from smartsim import Experiment
4from smartsim.log import get_logger
5
6# Initialize a logger object
7logger = get_logger("Example Experiment Log")
8# Initialize the Experiment
9exp = Experiment("getting-started", launcher="auto")
Colocated Model Initialization#
In the next stage of the Experiment, we create and launch a colocated Model that
runs the application script with a Orchestrator on the same compute node.
Step 1: Configure#
In this example Experiment, the Model application is a Python script as defined in section:
Application Script. Before initializing the Model object, we must use
Experiment.create_run_settings to create a RunSettings object that defines how to execute
the Model. To launch the Python script in this example workflow, we specify the path to the application
file application_script.py as the exe_args parameter and the executable exe_ex (the Python
executable on this system) as exe parameter. The Experiment.create_run_settings function
will return a RunSettings object that can then be used to initialize the Model object.
Note
Change the exe_args argument to the path of the application script on your file system to run the example.
Use the RunSettings helper functions to
configure the the distribution of computational tasks (RunSettings.set_nodes). In this
example, we specify to SmartSim that we intend the Model to run on a single compute node.
1# Initialize a RunSettings object
2model_settings = exp.create_run_settings(exe="path/to/executable_simulation")
3# Configure RunSettings object
4model_settings.set_nodes(1)
Step 2: Initialize#
Next, create a Model instance using the Experiment.create_model factory method.
Pass the model_settings object as input to the method and
assign the returned Model instance to the variable model:
1# Initialize a SmartSim Model
2model = exp.create_model("colo_model", model_settings)
Step 3: Colocate#
To colocate an Orchestrator with a Model, use the Model.colocate_db_uds function.
This function will colocate an Orchestrator instance with this Model over
a Unix domain socket connection.
1# Colocate the Model
2model.colocate_db_uds()
Step 4: Generate Files#
Next, generate the Experiment entity directories by passing the Model instance to
Experiment.generate:
1# Generate output files
2exp.generate(model)
Step 5: Start#
Next, launch the colocated Model instance using the Experiment.start function.
1# Launch the colocated Model
2exp.start(model, block=True, summary=True)
Cleanup#
Note
Since the colocated Orchestrator is automatically torn down by SmartSim once the colocated Model
has finished, we do not need to stop the Orchestrator.
1# Log the Experiment summary
2logger.info(exp.summary())
When you run the experiment, the following output will appear:
|    | Name   | Entity-Type   | JobID     | RunID   | Time    | Status    | Returncode   |
|----|--------|---------------|-----------|---------|---------|-----------|--------------|
| 0  | model  | Model         | 1592652.0 | 0       | 10.1039 | Completed | 0            |
Multiple Orchestrators#
SmartSim supports automating the deployment of multiple Orchestrators
from within an Experiment. Communication with the Orchestrator via a SmartRedis Client is possible with the
db_identifier argument that is required when initializing an Orchestrator or
colocated Model during a multiple Orchestrator Experiment. When initializing a SmartRedis
Client during the Experiment, create a ConfigOptions object to specify the db_identifier
argument used when creating the Orchestrator. Pass the ConfigOptions object to
the Client init call.
Multiple Orchestrator Example#
SmartSim offers functionality to automate the deployment of multiple
databases, supporting workloads that require multiple
Orchestrators for a Experiment. For instance, a workload may consist of a
simulation with high inference performance demands (necessitating a co-located deployment),
along with an analysis and visualization workflow connected to the simulation
(requiring a standalone Orchestrator). In the following example, we simulate a
simple version of this use case.
The example is comprised of two script files:
The Application Script
The
ExperimentDriver Script
The Application Script Overview:
In this example, the application script is a python file that
contains instructions to complete computational
tasks. Applications are not limited to Python
and can also be written in C, C++ and Fortran.
This script specifies creating a Python SmartRedis Client for each
standalone Orchestrator and a colocated Orchestrator. We use the
Clients to request data from both standalone Orchestrators, then
transfer the data to the colocated Orchestrator. The application
file is launched by the Experiment driver script
through a Model stage.
The Application Script Contents:
Connecting SmartRedis
Clientswithin the application to retrieve tensors from the standaloneOrchestratorsto store in a colocatedOrchestrator. Details in section: Initialize the Clients.
The Experiment Driver Script Overview:
The Experiment driver script holds the stages of the workflow
and manages their execution through the Experiment API.
We initialize an Experiment
at the beginning of the Python file and use the Experiment to
iteratively create, configure and launch computational kernels
on the system through the slurm launcher.
In the driver script, we use the Experiment to create and launch a Model instance that
runs the application.
The Experiment Driver Script Contents:
Launching two standalone
Orchestratorswith unique identifiers. Details in section: Launch Multiple Orchestrators.Launching the application script with a colocated
Orchestrator. Details in section: Initialize a Colocated Model.Connecting SmartRedis
Clientswithin the driver script to send tensors to standaloneOrchestratorsfor retrieval within the application. Details in section: Create Client Connections to Orchestrators.
Setup and run instructions can be found here
The Application Script#
Applications interact with the Orchestrators
through a SmartRedis Client.
In this section, we write an application script
to demonstrate how to connect SmartRedis
Clients in the context of multiple
launched Orchestrators. Using the Clients, we retrieve tensors
from two Orchestrators launched in the driver script, then store
the tensors in the colocated Orchestrators.
Note
The Experiment must be started to use the Orchestrators within the
application script. Otherwise, it will fail to connect.
Find the instructions on how to launch here
To begin, import the necessary packages:
1from smartredis import ConfigOptions, Client
2from smartredis import *
3from smartredis.error import *
Initialize the Clients#
To establish a connection with each Orchestrators,
we need to initialize a new SmartRedis Client for each.
Step 1: Initialize ConfigOptions#
Since we are launching multiple Orchestrators within the Experiment,
the SmartRedis ConfigOptions object is required when initializing
a Client in the application.
We use the ConfigOptions.create_from_environment
function to create three instances of ConfigOptions,
with one instance associated with each launched Orchestrator.
Most importantly, to associate each launched Orchestrator to a ConfigOptions object,
the create_from_environment function requires specifying the unique Orchestrator identifier
argument named db_identifier.
For the single-sharded Orchestrator:
1# Initialize a ConfigOptions object
2single_shard_config = ConfigOptions.create_from_environment("single_shard_db_identifier")
For the multi-sharded Orchestrator:
1# Initialize a ConfigOptions object
2multi_shard_config = ConfigOptions.create_from_environment("multi_shard_db_identifier")
For the colocated Orchestrator:
1# Initialize a ConfigOptions object
2colo_config = ConfigOptions.create_from_environment("colo_db_identifier")
Step 2: Initialize the Client Connections#
Now that we have three ConfigOptions objects, we have the
tools necessary to initialize three SmartRedis Clients and
establish a connection with the three Orchestrators.
We use the SmartRedis Client API to create the Client instances by passing in
the ConfigOptions objects and assigning a logger_name argument.
Single-sharded Orchestrator:
1# Initialize a SmartRedis client for the single sharded database
2app_single_shard_client = Client(single_shard_config, logger_name="Model: single shard logger")
Multi-sharded Orchestrator:
1# Initialize a SmartRedis client for the multi sharded database
2app_multi_shard_client = Client(multi_shard_config, logger_name="Model: multi shard logger")
Colocated Orchestrator:
1# Initialize a SmartRedis client for the colocated database
2colo_client = Client(colo_config, logger_name="Model: colo logger")
Retrieve Data and Store Using SmartRedis Client Objects#
To confirm a successful connection to each Orchestrator, we will retrieve the tensors
that we plan to store in the python driver script. After retrieving, we
store both tensors in the colocated Orchestrator.
The Client.get_tensor method allows
retrieval of a tensor. It requires the name of the tensor assigned
when sent to the Orchestrator via Client.put_tensor.
1# Retrieve the tensor placed in driver script using the associated client
2val1 = app_single_shard_client.get_tensor("tensor_1")
3val2 = app_multi_shard_client.get_tensor("tensor_2")
4
5# Print message to stdout using SmartRedis Client logger
6app_single_shard_client.log_data(LLInfo, f"The single sharded db tensor is: {val1}")
7app_multi_shard_client.log_data(LLInfo, f"The multi sharded db tensor is: {val2}")
Later, when you run the Experiment driver script the following output will appear in tutorial_model.out
located in getting-started-multidb/tutorial_model/:
Model: single shard logger@00-00-00:The single sharded db tensor is: [1 2 3 4]
Model: multi shard logger@00-00-00:The multi sharded db tensor is: [5 6 7 8]
This output showcases that we have established a connection with multiple Orchestrators.
Next, take the tensors retrieved from the standalone deployment Orchestrators and
store them in the colocated Orchestrator using Client.put_tensor(name, data).
1# Place retrieved tensors in colocated database
2colo_client.put_tensor("tensor_1", val1)
3colo_client.put_tensor("tensor_2", val2)
Next, check if the tensors exist in the colocated Orchestrator using Client.poll_tensor.
This function queries for data in the Orchestrator. The function requires the tensor name (name),
how many milliseconds to wait in between queries (poll_frequency_ms),
and the total number of times to query (num_tries):
1# Check that tensors are in colocated database
2colo_val1 = colo_client.poll_tensor("tensor_1", 10, 10)
3colo_val2 = colo_client.poll_tensor("tensor_2", 10, 10)
4# Print message to stdout using SmartRedis Client logger
5colo_client.log_data(LLInfo, f"The colocated db has tensor_1: {colo_val1}")
6colo_client.log_data(LLInfo, f"The colocated db has tensor_2: {colo_val2}")
The output will be as follows:
Model: colo logger@00-00-00:The colocated db has tensor_1: True
Model: colo logger@00-00-00:The colocated db has tensor_2: True
The Experiment Driver Script#
To run the previous application, we must define workflow stages within a workload.
Defining workflow stages requires the utilization of functions associated
with the Experiment object. The Experiment object is intended to be instantiated
once and utilized throughout the workflow runtime.
In this example, we instantiate an Experiment object with the name getting-started-multidb.
We setup the SmartSim logger to output information from the Experiment.
 1import numpy as np
 2from smartredis import Client
 3from smartsim import Experiment
 4from smartsim.log import get_logger
 5import sys
 6
 7exe_ex = sys.executable
 8logger = get_logger("Multidb Experiment Log")
 9# Initialize the Experiment
10exp = Experiment("getting-started-multidb", launcher="auto")
Launch Multiple Orchestrators#
In the context of this Experiment, it’s essential to create and launch
the Orchestrators as a preliminary step before any other components since
the application script requests tensors from the launched Orchestrators.
We aim to showcase the multi-Orchestrator automation capabilities of SmartSim, so we
create two Orchestrators in the workflow: a single-sharded Orchestrator and a
multi-sharded Orchestrator.
Step 1: Initialize Orchestrators#
To create an Orchestrator, utilize the Experiment.create_database function.
The function requires specifying a unique
Orchestrator identifier argument named db_identifier to launch multiple Orchestrators.
This step is necessary to connect to Orchestrators outside of the driver script.
We will use the db_identifier names we specified in the application script.
For the single-sharded Orchestrator:
1# Initialize a single sharded database
2single_shard_db = exp.create_database(port=6379, db_nodes=1, interface="ib0", db_identifier="single_shard_db_identifier")
3exp.generate(single_shard_db, overwrite=True)
For the multi-sharded Orchestrator:
1# Initialize a multi sharded database
2multi_shard_db = exp.create_database(port=6380, db_nodes=3, interface="ib0", db_identifier="multi_shard_db_identifier")
3exp.generate(multi_shard_db, overwrite=True)
Note
Calling exp.generate will create two subfolders
(one for each Orchestrator created in the previous step)
whose names are based on the db_identifier of that Orchestrator.
In this example, the Experiment folder is
named getting-started-multidb/. Within this folder, two Orchestrator subfolders will
be created, namely single_shard_db_identifier/ and multi_shard_db_identifier/.
Step 2: Start#
Next, to launch the Orchestrators,
pass the Orchestrator instances to Experiment.start.
1# Launch the single and multi sharded database
2exp.start(single_shard_db, multi_shard_db, summary=True)
The Experiment.start function launches the Orchestrators for use within the workflow. In other words, the function
deploys the Orchestrators on the allocated compute resources.
Note
By setting summary=True, SmartSim will print a summary of the
Experiment before it is launched. After printing the Experiment summary,
the Experiment is paused for 10 seconds giving the user time to
briefly scan the summary contents. If we set summary=False, then the Experiment
would be launched immediately with no summary.
Create Client Connections to Orchestrators#
The SmartRedis Client object contains functions that manipulate, send, and receive
data within the Orchestrator. Each Orchestrator has a single, dedicated SmartRedis Client.
Begin by initializing a SmartRedis Client object per launched Orchestrator.
To create a designated SmartRedis Client, you need to specify the address of the target
running Orchestrator. You can easily retrieve this address using the Orchestrator.get_address function.
For the single-sharded Orchestrator:
1# Initialize SmartRedis client for single sharded database
2driver_client_single_shard = Client(cluster=False, address=single_shard_db.get_address()[0], logger_name="Single shard db logger")
For the multi-sharded Orchestrator:
1# Initialize SmartRedis client for multi sharded database
2driver_client_multi_shard = Client(cluster=True, address=multi_shard_db.get_address()[0], logger_name="Multi shard db logger")
Store Data Using Clients#
In the application script, we retrieved two NumPy tensors.
To support the apps functionality, we will create two
NumPy arrays in the python driver script and send them to the a Orchestrator. To
accomplish this, we use the Client.put_tensor function with the respective
Orchestrator client instances.
For the single-sharded Orchestrator:
1# Create NumPy array
2array_1 = np.array([1, 2, 3, 4])
3# Use single shard db SmartRedis client to place tensor in single sharded db
4driver_client_single_shard.put_tensor("tensor_1", array_1)
For the multi-sharded Orchestrator:
1# Create NumPy array
2array_2 = np.array([5, 6, 7, 8])
3# Use single shard db SmartRedis client to place tensor in multi sharded db
4driver_client_multi_shard.put_tensor("tensor_2", array_2)
Lets check to make sure the Orchestrator tensors do not exist in the incorrect Orchestrators:
1# Check that tensors are in correct databases
2check_single_shard_db_tensor_incorrect = driver_client_single_shard.key_exists("tensor_2")
3check_multi_shard_db_tensor_incorrect = driver_client_multi_shard.key_exists("tensor_1")
4logger.info(f"The multi shard array key exists in the incorrect database: {check_single_shard_db_tensor_incorrect}")
5logger.info(f"The single shard array key exists in the incorrect database: {check_multi_shard_db_tensor_incorrect}")
When you run the Experiment, the following output will appear:
00:00:00 system.host.com SmartSim[#####] INFO The multi shard array key exists in the incorrect database: False
00:00:00 system.host.com SmartSim[#####] INFO The single shard array key exists in the incorrect database: False
Initialize a Colocated Model#
In the next stage of the Experiment, we
launch the application script with a co-located Orchestrator
by configuring and creating
a SmartSim colocated Model.
Step 1: Configure#
You can specify the run settings of a Model.
In this Experiment, we invoke the Python interpreter to run
the python script defined in section: The Application Script.
To configure this into a SmartSim Model, we use the Experiment.create_run_settings function.
The function returns a RunSettings object.
When initializing the RunSettings object,
we specify the path to the application file,
application_script.py, for
exe_args, and the run command for exe.
1# Initialize a RunSettings object
2model_settings = exp.create_run_settings(exe=exe_ex, exe_args="./path/to/application_script.py")
Note
You will have to change the exe_args argument to the path of the application script on your machine to run the example.
With the RunSettings instance,
configure the the distribution of computational tasks (RunSettings.set_nodes) and the number of instances
the script is execute on each node (RunSettings.set_tasks_per_node). In this
example, we specify to SmartSim that we intend to execute the script once on a single node.
1# Configure RunSettings object
2model_settings.set_nodes(1)
3model_settings.set_tasks_per_node(1)
Step 2: Initialize#
Next, create a Model instance using the Experiment.create_model.
Pass the model_settings object as an argument
to the create_model function and assign to the variable model.
1# Initialize a SmartSim Model
2model = exp.create_model("colo_model", model_settings)
Step 2: Colocate#
To colocate the Model, use the Model.colocate_db_uds function to
Colocate an Orchestrator instance with this Model over
a Unix domain socket connection.
1# Colocate the Model
2model.colocate_db_tcp(db_identifier="colo_db_identifier")
This method will initialize settings which add an unsharded
Orchestrator to this Model instance. Only this Model will be able
to communicate with this colocated Orchestrator by using the loopback TCP interface.
Step 3: Start#
Next, launch the colocated Model instance using the Experiment.start function.
1# Launch the colocated Model
2exp.start(model, block=True, summary=True)
Note
We set block=True,
so that Experiment.start waits until the last Model has finished
before returning: it will act like a job monitor, letting us know
if processes run, complete, or fail.
Cleanup Experiment#
Finally, use the Experiment.stop function to stop the standard Orchestrator instances.
Note
Co-located Orchestrator``s are stopped when their associated ``Model’s are stopped.
Print the workflow summary with Experiment.summary.
1# Tear down the single and multi sharded databases
2exp.stop(single_shard_db, multi_shard_db)
3# Print the Experiment summary
4logger.info(exp.summary())
When you run the experiment, the following output will appear:
00:00:00 system.host.com SmartSim[#####]INFO
|    | Name                         | Entity-Type   | JobID       | RunID   | Time    | Status    | Returncode   |
|----|------------------------------|---------------|-------------|---------|---------|-----------|--------------|
| 0  | colo_model                   | Model         | 1556529.5   | 0       | 1.7437  | Completed | 0            |
| 1  | single_shard_db_identifier_0 | DBNode        | 1556529.3   | 0       | 68.8732 | Cancelled | 0            |
| 2  | multi_shard_db_identifier_0  | DBNode        | 1556529.4+2 | 0       | 45.5139 | Cancelled | 0            |
How to Run the Example#
Below are the steps to run the Experiment. Find the
experiment source code
and application source code
below in the respective subsections.
Note
The example assumes that you have already installed and built SmartSim and SmartRedis. Please refer to Section Basic Installation for further details. For simplicity, we assume that you are running on a SLURM-based HPC-platform. Refer to the steps below for more details.
- Step 1Setup your directory tree
Your directory tree should look similar to below:
SmartSim/
SmartRedis/
Multi-db-example/
  application_script.py
  experiment_script.py
You can find the application and
Experimentsource code in subsections below.- Step 2Install and Build SmartSim
This example assumes you have installed SmartSim and SmartRedis in your Python environment. We also assume that you have built SmartSim with the necessary modules for the machine you are running on.
- Step 3Change the exe_args file path
When configuring the colocated model in experiment_script.py, we pass the file path of application_script.py to the exe_args argument on line 33 in experiment_script.py. Edit this argument to the file path of your application_script.py
- Step 4Run the
Experiment Finally, run the
Experimentwithpython experiment_script.py.
Application Source Code#
 1from smartredis import ConfigOptions, Client
 2from smartredis import *
 3from smartredis.error import *
 4
 5# Initialize a ConfigOptions object
 6single_shard_config = ConfigOptions.create_from_environment("single_shard_db_identifier")
 7# Initialize a SmartRedis client for the single sharded database
 8app_single_shard_client = Client(single_shard_config, logger_name="Model: single shard logger")
 9
10# Initialize a ConfigOptions object
11multi_shard_config = ConfigOptions.create_from_environment("multi_shard_db_identifier")
12# Initialize a SmartRedis client for the multi sharded database
13app_multi_shard_client = Client(multi_shard_config, logger_name="Model: multi shard logger")
14
15# Initialize a ConfigOptions object
16colo_config = ConfigOptions.create_from_environment("colo_db_identifier")
17# Initialize a SmartRedis client for the colocated database
18colo_client = Client(colo_config, logger_name="Model: colo logger")
19
20# Retrieve the tensor placed in driver script using the associated client
21val1 = app_single_shard_client.get_tensor("tensor_1")
22val2 = app_multi_shard_client.get_tensor("tensor_2")
23
24# Print message to stdout using SmartRedis Client logger
25app_single_shard_client.log_data(LLInfo, f"The single sharded db tensor is: {val1}")
26app_multi_shard_client.log_data(LLInfo, f"The multi sharded db tensor is: {val2}")
27
28# Place retrieved tensors in colocated database
29colo_client.put_tensor("tensor_1", val1)
30colo_client.put_tensor("tensor_2", val2)
31
32# Check that tensors are in colocated database
33colo_val1 = colo_client.poll_tensor("tensor_1", 10, 10)
34colo_val2 = colo_client.poll_tensor("tensor_2", 10, 10)
35# Print message to stdout using SmartRedis Client logger
36colo_client.log_data(LLInfo, f"The colocated db has tensor_1: {colo_val1}")
37colo_client.log_data(LLInfo, f"The colocated db has tensor_2: {colo_val2}")
Experiment Source Code#
 1import numpy as np
 2from smartredis import Client
 3from smartsim import Experiment
 4from smartsim.log import get_logger
 5import sys
 6
 7exe_ex = sys.executable
 8logger = get_logger("Multidb Experiment Log")
 9# Initialize the Experiment
10exp = Experiment("getting-started-multidb", launcher="auto")
11
12# Initialize a single sharded database
13single_shard_db = exp.create_database(port=6379, db_nodes=1, interface="ib0", db_identifier="single_shard_db_identifier")
14exp.generate(single_shard_db, overwrite=True)
15
16# Initialize a multi sharded database
17multi_shard_db = exp.create_database(port=6380, db_nodes=3, interface="ib0", db_identifier="multi_shard_db_identifier")
18exp.generate(multi_shard_db, overwrite=True)
19
20# Launch the single and multi sharded database
21exp.start(single_shard_db, multi_shard_db, summary=True)
22
23# Initialize SmartRedis client for single sharded database
24driver_client_single_shard = Client(cluster=False, address=single_shard_db.get_address()[0], logger_name="Single shard db logger")
25# Initialize SmartRedis client for multi sharded database
26driver_client_multi_shard = Client(cluster=True, address=multi_shard_db.get_address()[0], logger_name="Multi shard db logger")
27
28# Create NumPy array
29array_1 = np.array([1, 2, 3, 4])
30# Use single shard db SmartRedis client to place tensor in single sharded db
31driver_client_single_shard.put_tensor("tensor_1", array_1)
32
33# Create NumPy array
34array_2 = np.array([5, 6, 7, 8])
35# Use single shard db SmartRedis client to place tensor in multi sharded db
36driver_client_multi_shard.put_tensor("tensor_2", array_2)
37
38# Check that tensors are in correct databases
39check_single_shard_db_tensor_incorrect = driver_client_single_shard.key_exists("tensor_2")
40check_multi_shard_db_tensor_incorrect = driver_client_multi_shard.key_exists("tensor_1")
41logger.info(f"The multi shard array key exists in the incorrect database: {check_single_shard_db_tensor_incorrect}")
42logger.info(f"The single shard array key exists in the incorrect database: {check_multi_shard_db_tensor_incorrect}")
43
44# Initialize a RunSettings object
45model_settings = exp.create_run_settings(exe=exe_ex, exe_args="./path/to/application_script.py")
46# Configure RunSettings object
47model_settings.set_nodes(1)
48model_settings.set_tasks_per_node(1)
49# Initialize a SmartSim Model
50model = exp.create_model("colo_model", model_settings)
51# Colocate the Model
52model.colocate_db_tcp(db_identifier="colo_db_identifier")
53# Launch the colocated Model
54exp.start(model, block=True, summary=True)
55
56# Tear down the single and multi sharded databases
57exp.stop(single_shard_db, multi_shard_db)
58# Print the Experiment summary
59logger.info(exp.summary())